
Setting up a netboot server in Fedora/CentOS
I’ve had a request for an explanation on how we use PXE and syslinux in our school. In a previous post, I talked a bit about chain-loading pxe, but didn’t explain much on how our system is set up.
So here goes…
Our primary goal in setting up a PXE environment was to have some way of imaging our computers without having to screw around with an ancient version of Norton Ghost and without having to put a floppy in every computer.
The problem was that we really didn’t want students to be able to reimage the computers whenever they wanted to, and there were other tools we wanted to use that we wanted restricted.
The solution was PXELINUX’s simple menu, and it works beautifully! This post will walk you through the process of setting up PXELINUX (and gPXE while we’re at it).
For this post, I am assuming that you already have a DHCP server and a web server set up.
There are three things we need to set up:
- TFTP server
- gPXE
- Syslinux
The first step is to set up a TFTP server to carry our gPXE images.
- Run
yum install tftp-server - Edit /etc/xinetd.d/tftp and change the line that says
todisable = yesdisable = no - If this is the initial installation of xinetd, you may need to run
chkconfig --levels 2345 xinetd on
at this point. Otherwise, it might be a good idea to runservice xinetd startservice xinetd reload
Now, for the next step, we need to download our gPXE images. gPXE is an extended version of PXE that allows you to load images over http and https in addition to the usual tftp. As most (all?) network cards don’t come with gPXE drivers, we will be using PXE to download and bootstrap our gPXE drivers.
As mentioned in my previous post, some of our motherboards seem to have issues mixing PXE and their normal PXE UNDI drivers, so I prefer to use gPXE’s native drivers rather than its UNDI driver.
However, we have four computers whose network cards just don’t work with gPXE’s native drivers, so we will direct those four computers to the gPXE UNDI driver.
So let’s grab and setup these drivers:
- Go to ROM-o-matic and choose the latest production release
- For output format, choose “PXE bootstrap loader image [Unload PXE stack] (.pxe)”
- Choose NIC type “all-drivers”
- Click on “Customize”
- Check the box that says “DOWNLOAD_PROTO_HTTPS”
- Click on the button that says “Get Image”
- Save file to /tftpboot/gpxe.pxe
- Change NIC type to “undionly”
- Click on the button that says “Get Image”
- Save file to /tftpboot/undi.pxe
I’m assuming you’re running the ISC dhcp server (dhcp package on both Fedora and CentOS). If not, you’ll have to work out these next steps yourself.
You need to edit /etc/dhcpd.conf and add the following lines:
next-server     ip address;

if exists user-class and option user-class = "gPXE" {
    filename "http://webserver/netboot/pxelinux.0";
} else {
    filename "/gpxe.pxe";
}
Where ip address is the ip address of your TFTP server and webserver is the name/ip address of your web server.
If you have some computers that won’t pxeboot using gPXE’s native drivers (you’ll be able to tell because the computers will show the gPXE loading screen, but won’t be able to get an IP address using DHCP while in gPXE), change the last five lines above to:
if exists user-class and option user-class = "gPXE" {
    filename "http://webserver/netboot
} else {
    if binary-to-ascii(16, 8, ":",
       substring(hardware, 1, 6)) = "mac address 1"
    or binary-to-ascii(16, 8, ":",
       substring(hardware, 1, 6)) = "mac address 2" {
        filename "/undi.pxe";
    } else {
        filename "/gpxe.pxe";
    }
}
Where “mac address 1” and “mac address 2” are the MAC addresses of the computers that don’t work with gPXE’s native drivers. Please note the MAC address are without leading zeros (i.e. 00:19:d1:3a:0e:4b becomes 0:19:d1:3a:e:4b).
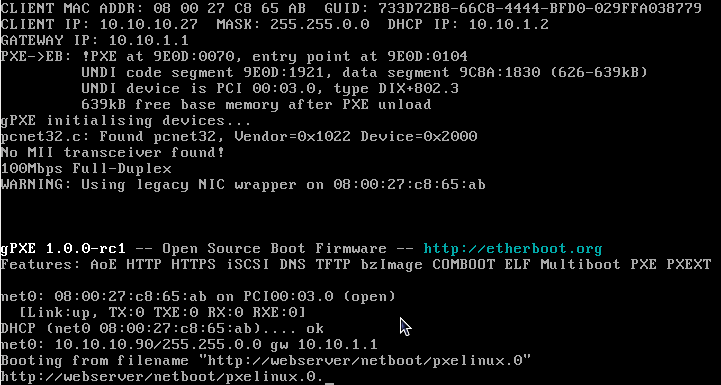
At this point, if you boot any computer on your network off the NIC, you should see something like this:
The next step is to setup PXELINUX, a part of the Syslinux Project. PXELINUX is a small bootloader designed for booting off a network.
-
On your web server, create a directory called “netboot” in your web root (normally /var/www/html on Fedora/CentOS).
-
Run
yum install syslinuxor, as an alternative, build a newer version of syslinux. I recommend at least 3.75 (the version in Fedora 12), though I’m using 3.82 at the school.
-
Copy (at minimum) chain.c32, menu.c32, vesamenu.c32 and pxelinux.0 to “netboot” in your web root. (These files will be located in /usr/share/syslinux if you installed the package using yum.) At this point, you’ll probably want to check for other modules that might have some potential. We use ifcpu64.c32 to decide between 32-bit and 64-bit Fedora on the computers.
-
Run:
yum install memtest86+
cp /boot/elf-memtest86+-4.00 \
your_web_root/netboot/memtest
(Note that “your_web_root” will most likely be /var/www/html)
-
Download this picture and save it to your_web_root/netboot
-
Change directory to your_web_root/netboot
-
Run
mkdir pxelinux.cfg cd pxelinux.cfg -
Create a file called “default” that contains the following:
default vesamenu.c32 timeout 40 prompt 0 noescape 1 menu title Boot Options menu background menu.png menu master passwd $4$tek7ROr8$xzFCb2QVEWsc2msx3QsErbRuo0Y$ label local menu label ^Boot from hard drive kernel chain.c32 append hd0 label admin menu label ^Administrative tools kernel vesamenu.c32 append pxelinux.cfg/admin menu passwd $4$tek7ROr8$xzFCb2QVEWsc2msx3QsErbRuo0Y$ -
Create a file called “admin” that contains the following:
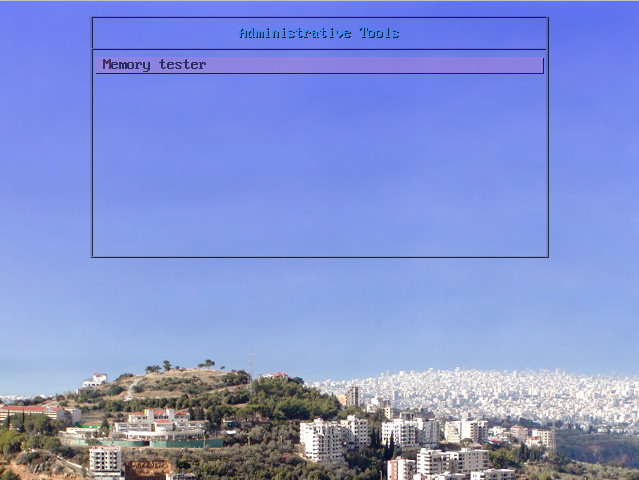
default vesamenu.c32
timeout 40
prompt 0
noescape 1
menu title Administrative Tools
menu background menu.png
menu master passwd $4$tek7ROr8$xzFCb2QVEWsc2msx3QsErbRuo0Y$

label memtest
menu label ^Memory tester
kernel memtest
If you boot any computer on your network off the NIC, you should see something like this:

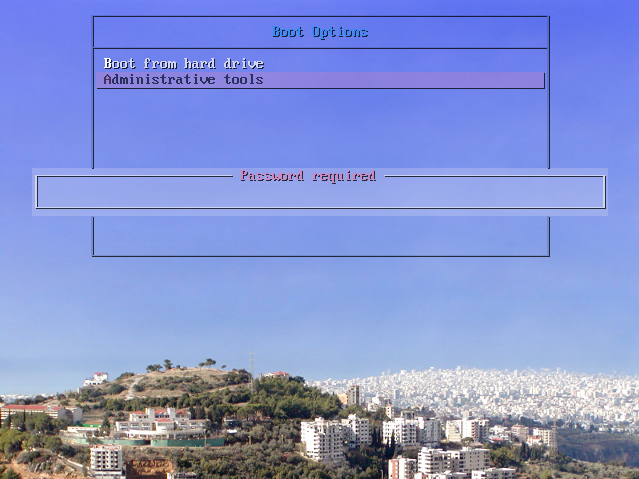
So now you have a double layered menu system with a password required to get to the second layer. For reference’ sake, the current password is “purple”, and you can generate your own password by running sha1pass (included in the syslinux package).
If you wanted to add other administrative tools, you would add them to the file “admin” in netboot. For more information on how to add items to the menu, see this page.
Comments
Martin Ledvina
Monday, Feb 1, 2010
Luis
Tuesday, Feb 2, 2010
Hi,
Terrific post! Thank you for replaying to my request so quickly. I’ve read the post a bit diagonally, but I will read it with the attention it deservs in the next few days. I am the only sys admin in a companny with too many requests per day. I need to automate and make my life easier every time I can.
Thank you very much for this post.
Jonathan Dieter
Tuesday, Feb 2, 2010
I’m sorry that you’re disappointed. I didn’t realize there was a wiki page on the CentOS page, but now that I’ve checked it out, I can see why you feel that way.
I do think my article approached it from a different angle, and if you, or someone else, would like to put it (or parts of it) in any wiki, feel free to. Consider this article licensed under CC-BY-SA.
Jonathan Dieter
Tuesday, Feb 2, 2010
Martin Ledvina
Tuesday, Feb 2, 2010